10 Settings
The Settings screens allows you to control how Power Trader looks, sounds, and behaves.
To open the Settings panel, click on the Power Trader button (top left) and choose > Settings.
The Settings screen opens.
You can access the various settings by clicking the heading in the list or using the arrow buttons in the top right to navigate between settings screens.
- General Settings
- Workspaces and Layouts Settings
- FX Cell Settings
- Trading Defaults Settings
- Order Defaults Settings
- Panel Settings
- HotKeys Settings
- Sound Settings
- Mail Server Settings
10.1 General Settings
You control the general behavior and appearance of Power Trader from the General settings screen (BNFX Button > Settings > General).
- Run on startup: When checked, Power Trader automatically runs when you start or reboot your workstation.
- Automatic reconnection: When checked, Power Trader automatically tries to connect to the server when your connection is loss. When uncheck, Power Trader asks if you want to reconnect.
- Minimize to tray: When checked, Power Trader minimizes to an icon in the tool tray instead of a button on the taskbar. When unchecked, Power Trader minimizes to a button on the taskbar.
- Display local time: When checked, Power Trader used the workstation's local time for display. When unchecked, the server time is used.
- Display amount in lots: When checked, amounts are displayed in lots. When unchecked, amounts are shown in units. (Example: 100,000 units is 1.0 Lot)
- Save data for offline use: When checked, quotes are saved to local storage on your workstation and you can use them in offline mode after you disconnect. When unchecked, quotes are not saved.
- Show amount as signed: When checked, amounts bought are positive and amounts sold are negative. When unchecked, both buy and sell amounts are positive.
- Default Instrument: Specifies the default instrument that is displayed, for example when you open a new Chart panel.
- Show deal tickets: The radio buttons determine how deal tickets are automatically displayed when you do a deal:
- None: No deal ticket is displayed automatically.
- As ticket: The deal ticket is shown as a window.
- As tooltip: The deal ticket is shown as a tooltip in the lower right of the screen. You can click on the tooltip to open a deal ticket window.
- Language: If your installation allows it, you can choose the language of user interface.
- Show SL/TP price in: Specifies how order prices are displayed. Select Offset or Absolute values. With offset values, the SL/TP price is expressed as an offset from the order price(for example, -0.02). With absolute values, the price is expressed as a price with no relation to the underlying order price (for example, 1.68).
- Path to offline history data: Specifies the path that Power Trader uses to store data if you enable Save data for offline use. To change this path, click the
 button or the
  button to clear it.
10.2 Workspaces and Layouts Settings
You specify values and functionality related to your trading screen workspace in the Workspaces and Layouts settings screen (BNFX Button > Settings > Workspaces and Layouts).
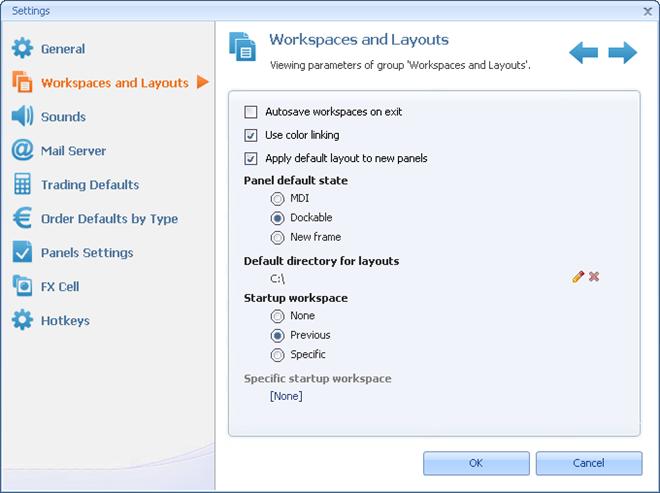
Figure 80: Workspaces and Layouts Settings Screen
- Check the Autosave workspaces on exit checkbox to automatically save your workspace when you exit Power Trader.
- Check the Use color linking checkbox to use color linking. see Linking Panels for more details.
- Check the Apply default layout to new panels checkbox to apply the default layout to all new panels.
- The radio buttons under Panel Default State determine how new panels are added. MDI opens a floating panel. Dockable opens a floating panel that you can dock inside the trading screen. New frame opens the panel as a frame separate from the trading screen that also appears in the Windows taskbar. see Arranging Panels for more details.
- The Default directory for layouts field determined the path where layout files are saved. Click the
 button to edit this value or the
  button to clear the field.
 - The radio buttons under Startup Workspace determine the workspace that is loaded when you first log in to Power Trader. To start with an empty workspace, click the None radio button. To start with whichever workspace was active the last time you logged in, click the Previous radio button. To start with specific workspace, click the Specific radio button and then click the
 button next to Specific startup workspace to choose a workspace file to load whenever you log in.
10.3 FX Cell Settings
FX Cells are used to show prices and enter orders in the Order Entry panel in other panels in board view.
To configure the appearance and behavior of FX Cells:
- Click BNFX Button > Settings and click FX Cell.
- Under Cell Properties, check the checkboxes of the cell components you want to display:
- Show Arrows: Shows/hides price change direction indicator arrows.
- Show Chart: Shows/hides price chart.
- Show Positions Balance: Shows/hides a button that displays your current balance total and price. Click the button to open the Close All Positions dialog.
- Show Range: Shows/hides the range for market orders.
- Show Trading Mode Switch:
- Under Price Type, click one of the following radio buttons:
- Bid/Ask: Shows straight bid/ask prices (default)
- VWAP: Shows volume-weighted average price (VWAP), the weighted average price based on the current market price from different liquidity providers in the market.
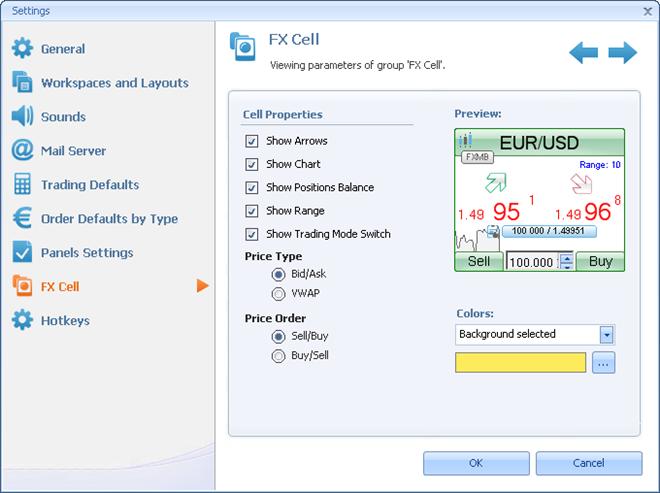

Figure 81: FX Cell Settings Screen
10.3.1 FX Cell Colors
You can configure the colors for the FX Cell. Choose BNFX Button > Settings, then click the FX Cell tab. On the right side of the panel, you choose the component of the FX Cell that you want to change from the Colors drop-down list and then click the ellipsis button ( ![]() ) next to the color sample to choose a new color.
) next to the color sample to choose a new color.
10.4 Trading Defaults Settings
You specify Power Trader overall trading behavior in the Trading Defaults settings screen.
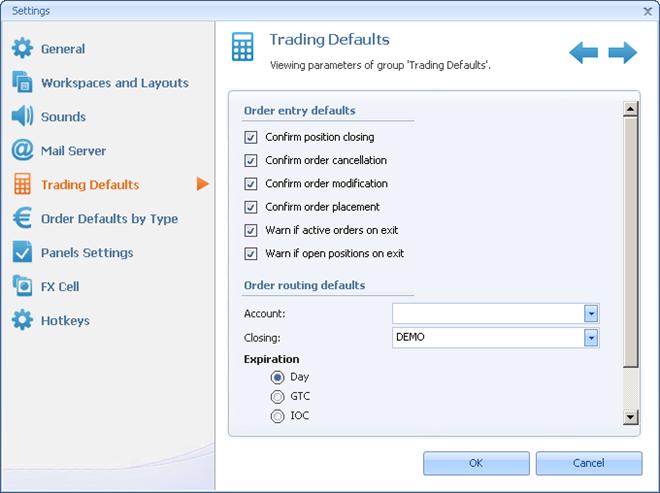
Figure 82: Trading Defaults Settings Screen
To configure default trading behavior, click BNFX Button > Settings > Trading Defaults:
- Check the Confirm position closing checkbox to require confirmation for all position closings.
- Check the Confirm order cancellation checkbox to require confirmation for order cancellation.
- Check the Confirm order modification checkbox to require confirmation for order modification.
- Check the Confirm order placement checkbox to require confirmation for order placement.
- Check the Warn if active orders on exit checkbox to receive a warning if you try to exit Power Trader with active orders.
- Check the Warn if open positions on exit checkbox to receive a warning if you try to exit Power Trader with open positions.
- Under Order Routing Defaults, you can select the account to which trading rules are applied from the Account drop-down list. If left empty, trading rules are applied to all accounts if you are a broker or have linked users.
- Under Order Routing Defaults, you can select the route on which closing operations are executed from the Closing drop-down list.
- Choose the default order expiration from the radio buttons Day, GTC, or IOC.
- Choose the default order type from the Order type drop-down list.
- Select the route on which orders are executed from the Placement drop-down list.
TRUE ONE-CLICK TRADING
To enable faster order entry and exit with true one-click trading, UNCHECK the
"Confirm position closing", "Confirm order cancellation", "Confirm order modification", and "Confirm order placement" on this screen.
10.5 Order Defaults Settings
In the Order Defaults settings screen, you specify the settings that determine the default values and behavior in all panels involved in order entry.
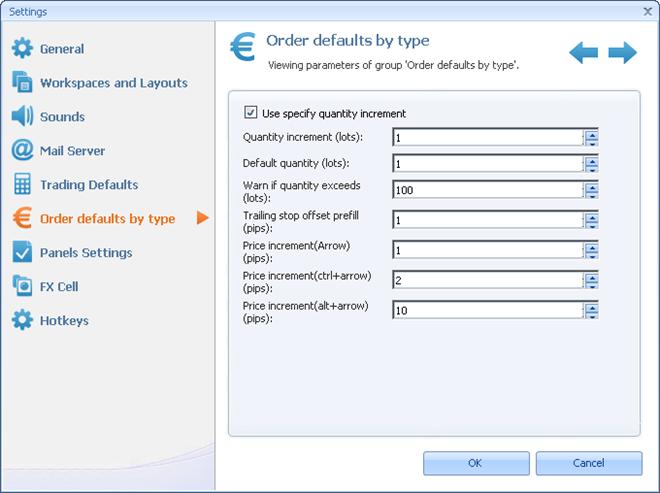
Figure 83: Order Defaults Settings Screen
To specify order defaults:
- Click BNFX Button > Settings > Orders Defaults by Type.
- Enter the following values as necessary:
- If you want all quantity amounts to increment by a whole number of lots, check the Use specify quantity increment checkbox and enter a positive whole number in the Quantity increment (lots) field.
- The Default quantity (lots) field specifies the default value of quantity fields.
- If a quantity exceeds the value in the Warn if quantity exceeds (lots) field, Power Trader warns you and asks you to confirm your quantity entry.
- The Trailing stop offset prefill (pips) field specifies the default offset value for trailing stops on orders.
- Three fields allow you to specify the value by which you can increment prices using the keyboard, such as in the Limit Price field in the Order Entry panel). The Price increment (Arrow) (pips) field specifies the increment value when you press the up and down arrow keys. The Price increment (ctrl+arrow) (pips) field specifies the increment value when you press the Ctrl and up arrow or down arrow keys together. The Price increment (alt+arrow) (pips) field specifies the increment value when you press the Alt and up arrow or down arrow keys together.
10.6 Panel Settings
You use the Panel Settings screen to configure the default values and behavior for various panels.
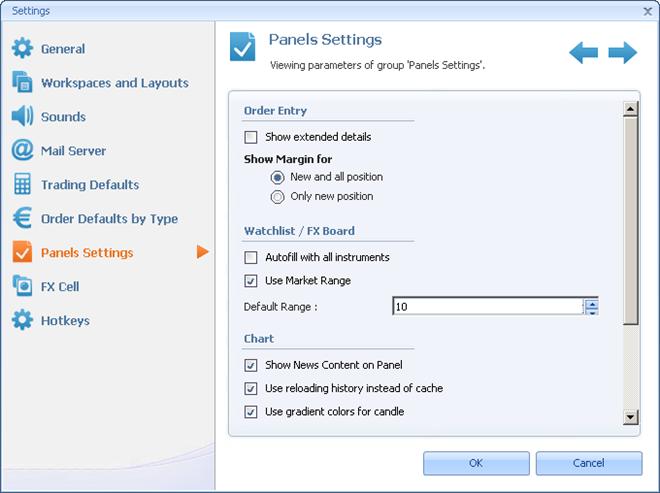
Figure 84: Panel Settings Screen
To change panel settings, click View > Settings > Panel Settings:
- Order Entry panel:
- Check the Show extended details checkbox to show extended details like margin and commission by default in the Order Entry panel.
- Under Show Margin for, choose the mode for showing initial and maintenance margins, either New and all position or Only new position.
- Watchlist/FX Board:
- Check the Autofill with all instruments checkbox to automatically fill new Watchlist/FX Board panels with all instruments. Otherwise, only the default instrument (as defined in the General settings screen) is shown.
- To display the market range field for each instrument in the FX Board panel, check the Use Market Range checkbox and then enter a number of pips for the default offset in the Default Range field. This setting only applies to new FX Board panels.
- Chart:
- Check the Show News Content on Panel checkbox to news on the chart as an clickable event.
- Check the Use reloading history instead of cache checkbox to force the history to be reloaded from the server every time the chart is refreshed.
- Check the Use gradient colors for candle checkbox to show the candles in a candle chart with gradient colors. If you uncheck this option, the candles display in single colors and appear flat, but your display performance may increase.
- You can also specify the default settings for new Chart panels in the Default amount of bars field, Default Interval drop-down list, and Default style drop-down list.
- Browser: Some Power Trader tools, such as the Deposit tool, access a website that is displayed in a browser window. The exact tools vary by user and installation. By default, these tools are displayed in an external browser window. If you want these tools to display in your workstation's default Web browser external to Power Trader, check the Use External Browser Window checkbox.
10.7 HotKeys Settings
HotKeys allow you to invoke Power Trader functionality with a single keystroke or keystroke combination.
You can customize existing HotKeys and create new ones in the HotKeys settings screen.

Figure 85: HotKeys Settings Screen
To edit an existing HotKey:
- Click BNFX Button > Settings > HotKeys.
- Expand the appropriate category in the list and click an action to edit.
- Click the Assigned Combination field.
- Press the key combination you want. The value of the field updates with your combination.
- Click Set and then OK.
To create a new action assigned to a HotKey:
- Click BNFX Button > Settings > HotKeys.
- Click the create custom actions link. A new item is added under User action in the list.
- Double-click the <Empty order params> entry in the list.
The Order Entry panel appears.
- Set the parameters for a new order and click the buy or sell button. These are the parameters of the order that is placed when you use the HotKey.
- Click the Combination field.
- Press the key combination you want. The value of the field updates with your combination.
- Click Set and then OK.
10.8 Sound Settings
Power Trader can play sounds to alert you of certain events.
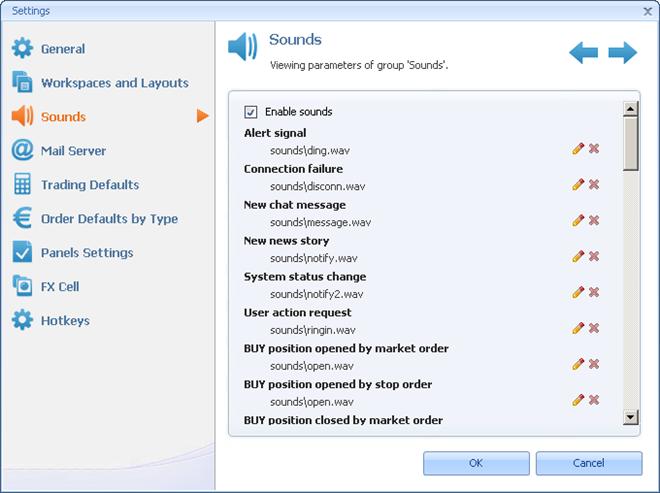
Figure 86: Sound Settings Screen
To configure sounds:
- Click BNFX Button > Settings > Sounds.
- Check the Enable sounds to play sounds.
- When sounds are enabled you can then change the sounds that Power Trader plays for various events by clicking
 button or disable the individual sound by clicking
  button.
 - Click OK.
10.9 Mail Server Settings
You use the Mail Server screen (View > Settings > Mail Server) configure the settings that Power Trader uses to send email notifications.
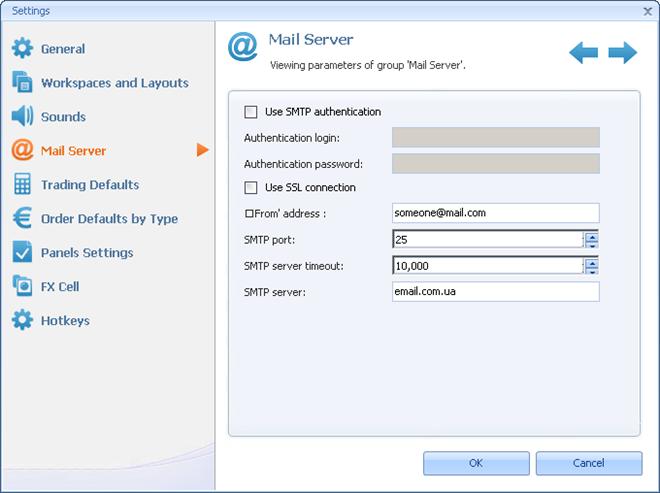
Figure 87: Mail Server Settings Screen
To configure your email settings:
- Click BNFX Button > Settings > Mail Server.
- If your email server requires SMTP authentication, check the Use SMTP authentication checkbox and enter your login and password in the appropriate fields.
- If your email server uses an SSL connection, enter the necessary information:
- 'From address' specifies the e-mail address for sending e-mail messages.
- SMTP port: specifies mail server SMTP port.
- SMTP server timeout specifies server's timeout in milliseconds.
- SMTP server specifies the SMTP server for sending e-mails.
Back to BNFX - An Integral Power Trader Forex Broker
Power Trader is a product of Integral Development Corp., licensed and customised for BNFX Capital Ltd. All rights reserved.
RISK WARNING: Forex trading involves risk of loss and may not be suitable for all investors.