5.1 Managing Workspaces
A workspace is a particular configuration of panels, toolbars and chart and table layouts that forms your trading environment. Power Trader provides predefined default workspaces and lets you create any number of custom workspaces by either modifying default workspaces or starting a new workspace from scratch. You can save custom workspaces to .wrk files and call them up whenever you want.
5.1.1 Default Workspaces
To load a default workspace, select View > Default Workspace > desired workspace.
A standard Power Trader installation includes one default workspace.
Your broker may include more workspaces.
When you make changes to a workspace, it becomes a custom workspace. To use a custom workspace in the future sessions, you need to save it to a file.
TIP: You can make your custom workspaces default workspaces by saving them to the ...\Program Files\BNFX Power Trader\DefaultWorkspaces folder. When saved to this folder, the workspace appears in the Default Workspaces list in the View menu.
5.1.2 Keeping Multiple Workspaces Open
During your session, you can load as many workspaces as needed, and you can keep multiple workspaces open at the same time. When you have more than one workspace open, they appear as tabs at the bottom of the screen.
When you load a workspace, either default or custom, or create a new blank workspace, the following confirmation message displays:
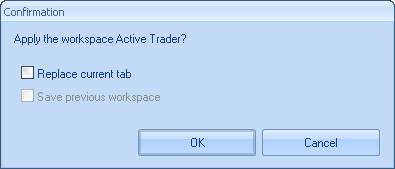
Figure 37: Workspace Application Dialog
If you leave both check boxes unchecked, the new workspace open on a new tab. To replace your current workspaces with the new one, check Replace current tab. The second check box, Save previous workspace, becomes available; select it if you want your current workspace saved to a file. When you finish, click OK.
5.1.3 Opening a Blank Workspace
To create a new blank workspace (no panels, all toolbars), select View > New Workspace.
5.1.4 Saving a Workspace to a File
You can save any customizations you make to the workspace in a workspace file (.wrk) and load it at a later time.
To save the current workspace to a file:
- Select View > Save As.... This opens the Save Workspace to File dialog box.
- Browse to the folder where you want to save the workspace file.
- Enter a name for the workspace file.
- Click Save.
To save any subsequent changes to this workspace, select File > Save Workspace or press Ctrl+S.
TIP: Power Trader prompts you to save your workspaces when you exit the program. To save your workspaces automatically, select BNFX Button > Settings. In the Workspaces and Layouts section, check Autosave workspaces on exit.
5.1.5 Loading a Workspace from a File
To load a saved workspace from file, select View > Load Workspace. In the Load Workspace from File dialog box, locate and select your .wrk file and click Open.
TIP: Power Trader loads the most recent workspace on startup. To start with a blank workspace each time you log in, select BNFX Button > Settings. In the Workspaces and Layouts section, set Startup workspace to None. To start with the same workspace each time, set this option to Specific and select a workspace file for Specific workspace.
5.1.6 Renaming a Workspace
You can rename any open workspace. To rename a workspace, right-click its tab and select Rename Workspace, or double-click the tab. The tab becomes highlighted. Enter a new name for the workspace and press Enter.
TIP: When you open a new instance of an already open workspace on the new tab, the system prompts you to rename the new workspace. After you click OK, the workspace tab highlights automatically. Type a new name and press Enter.
5.1.7 Closing a Workspace
To close a workspace, right-click its tab and select Close Workspace. You will be prompted to save the workspace. Click OK to save the workspace to file or Cancel to discard it.
5.2 Arranging Panels
You can create your own trading environment by displaying, hiding, and rearranging the panels and toolbars.
Any of the default workspaces can serve as a basis for your new workspace. Alternatively, you can build a workspace from scratch. Select View > New Workspace to get a blank screen. Then, open the panels you want using the Trading Terminal toolbar and arrange them as described below. When satisfied with your workspace, save it to a file. see Saving a Workspace to a File for details.
5.2.1 Detached, Docked, and Floating Panels
Similar to toolbars, a panel can appear in one of three states: detached, docked, or floating.
A detached panel is a separate window independent of the main Power Trader window. This is useful, for example, when displaying certain panels on a second monitor.
To detach a panel, right-click the panel's header bar select Detach or click the detach button![]() . This option works only when the panel is floating. If the panel is docked, float it first.
. This option works only when the panel is floating. If the panel is docked, float it first.
A floating panel can be moved freely over the main Power Trader window and may go under the edge of the window so that only a part of the panel is visible.
A docked panel can be arranged into tabbed areas where one or more panels are located on tabs under another panel.
When you open a new panel by selecting Add Panel > [desired panel], the panel is docked.
5.2.2 Resizing Panels
To change the size of a panel, point to the panel's edge to see your cursor change to a two-sided arrow. Then, click and drag the border (if floating) or the splitter bar (if docked) to resize the panel.
5.2.3 Collapsing Panels
Click the pin button ![]() in the panel's header to reduce the panel to a label pinned along the edge of the main window. When you move the mouse over the label, the panel expands halfway. Click the pin button again to completely expand the panel.
in the panel's header to reduce the panel to a label pinned along the edge of the main window. When you move the mouse over the label, the panel expands halfway. Click the pin button again to completely expand the panel.
5.2.4 Moving Panels
To move a floating panel, click its header and drag the panel to the desired location.
To move a docked panel, click and drag the panel's header (if separate) or tab (if in a tabbed group).
Arrow buttons ![]() appear at all four edges of the main screen, and a transparent rectangle representing the panel follows your mouse. The arrows point to the edge of the main screen to which the panel docks.
appear at all four edges of the main screen, and a transparent rectangle representing the panel follows your mouse. The arrows point to the edge of the main screen to which the panel docks.
A cluster of arrows indicate the edges of a panel area within main screen. Use these arrows for moving a panel within another panel.

Figure 38: Arrows for Moving a Panel Within Another Panel
Drag the rectangle over an arrow to see the arrow highlight and release the mouse button.
If, while dragging, you drop a panel on any part of the screen, grab it by the header again and continue dragging.
Clicking the header of a panel in a tabbed area moves the entire tabbed area.
5.2.5 Creating Tabbed Groups
Creating tabbed groups of panels helps save screen space while having all necessary panels close to hand.
To make a panel appear as a tab, drag it over another panel (or tabbed area). A button appears ![]() . Drag the rectangle over the button to see it highlight and release the mouse button.
. Drag the rectangle over the button to see it highlight and release the mouse button.
5.2.6 Hiding Panel Headers
You can hide panel headers (title bars) to save additional space. To hide the header, right-click the panel and select Hide Header. The header bar narrows to a thin line that you can still right-click to access options and click-and-drag to move the panel.
5.2.7 Renaming Panels
To rename a panel, right-click its title bar and select Rename. In the field that appears, type the new name and press Enter.
5.3 Configuring the Status Bar
The status bar, located at the bottom of the screen, is a quick source of information. You can choose the information you want displayed.

Figure 39: Configuring the Status Bar
The status bar can display (from left to right):
- Messages: Normally, these are the messages from your Broker that welcome you or inform you that the market is closed. At times, they may be replaced by important announcements, so it is good to keep messages displayed.
- News: The news ticker. Double-click a news headline to display the full text of the story in a Web Browser.
- Quotes: The quote ticker. Double-click a quote to open a chart for the symbol.
- Account Summary: Shows up to three items from your Account Summary panel (Account Summary Panel).
- Connection Status: Shows a green circle when you are connected to the server, and the number of messages (quotes, trading requests, responses, and so on) received and sent during the current session. When disconnected, the circle turns purple.
- Date/Time: The current time or date or both date and time.
To select the items you want displayed, right-click the status bar and click the item to place a check against it. To configure the Account Summary display, point to the Account Summary at the bottom of the menu and place checks against the items you want. Use the same procedure to configure the Date/Time display.
5.4 Linking Panels
You can link some panels together so that selecting a symbol in one of the panels causes other panels in the group to display information pertinent to that symbol. For example, when you have the Order Entry panel (Order Entry Panel) linked to the Watchlist panel (Watchlist Panel), the symbol selected in Order Entry panel changes dynamically as you select symbols in the Watchlist panel.
You can make up to six links in a workspace. Each link is identified by a color: red, yellow, green, black, blue, and brown.
To enable color linking:
- Select BNFX Button > Settings.
- In the Settings dialog box click Workspaces and Layouts.
- Check Use color linking. The Link toolbar is added to the main screen and panels that can be linked display a link button
 in their headers to the left of the usual window management buttons.
To link two or more panels together:
- Click the link button in one of the panels you want to link.
- From the drop-down menu, select one of the colors. The button changes to display the color, for example
 .
. - Repeat the same procedure for other panels to be linked, selecting the same color.
You can also link all panels in the workspace by selecting Link to All.
To unlink a panel from a group, click on the Link button and select Unlink.
5.4.1 Using the Links Toolbar
One of the ways to use links you have set up is to display the Links toolbar by click the arrow button on the top right of the ribbon ![]() .
.
![]()
Figure 40: Links Toolbar
Using this toolbar, you can change the symbol watched by a linked group. First, select the symbol from the drop-down list or click the lookup button ![]() . Then, click the
. Then, click the ![]() button and select one of the color links from the drop-down menu.
button and select one of the color links from the drop-down menu.
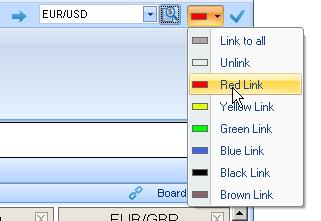
Figure 41: Links Toolbar with Link Colors
All panels in the linked group (here, Green) now display the selected symbol (here, EUR/USD).
You can link all the panels in the workspace by click the link all button ![]() .
.
5.5 The Ribbon
You access Power Trader features and functionality through the ribbon, a collection of buttons collected under related tabs.
- View: Account management, trading workspaces, and options (
- Trading: Access to various panels that allow you to trading, to analyze your trading activity, and monitor market conditions.
- Chart: Tools for viewing the market graphically, trading directly from charts, and capturing chart data
- Trading Systems: Access to chart indicators and drawing tools for implementing trading strategies
- Tools: General lookup, reporting, and trading functions
You can choose to maximize the ribbon for easy access or minimize it to optimize the screen for trading.
To minimize/maximize the ribbon, click the customize button in the Quick Access Toolbar at the top right of the screen. Choose Maximize the Ribbon to show the ribbon for easy access. Choose Minimize the Ribbon to hide the ribbon and only show it when you click a ribbon tab.
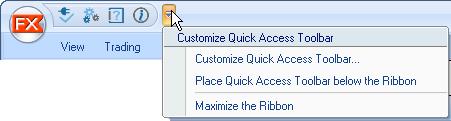
Figure 42: Minimizing/Maximizing the Ribbon
5.6 Quick Access Toolbar
The Quick Access Toolbar at the top right of the screen gives you single-click access to many Power Trader tools and functions.
You can customize the toolbar so that you can easily access the tools you use most frequently.
To add and remove commands in the Quick Access Toolbar:
- Click the menu button in the toolbar.

Figure 43: Quick Access Toolbar
- Click Customize Quick Access Toolbar.
The Customize Quick Access Toolbar opens.
- Choose a category from the Choose commands from drop-down list.
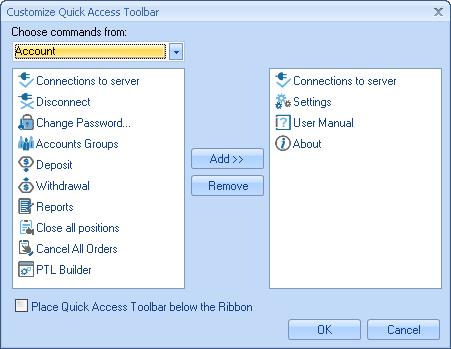
Figure 44: Customizing the Quick Access Toolbar
- To add a command, in the list on the left, click the command that you want to add and then click Add>>.
- To remove a command, in the list on the right, click the command that you want to remove and then click Remove.
- You can also choose to show the toolbar above or below the ribbon by checking or unchecking the Place Quick Access Toolbar below the Ribbon checkbox.
- Click OK.
5.7 Styles
A style is a graphic design you can apply to your workspace that affects the appearance of panels, the ribbon (The Ribbon) and the status bar (Configuring the Status Bar). During your session, you can switch between styles and color schemes as often as you wish.
The pre-defined styles are described below. To switch to another style, select View > Style > [desired style].
Power Trader saves your style selection between the sessions.
- Blue
- Black
- Silver
- Vista Glass
- Classic
You can then apply custom colors by clicking the appropriate Color scheme check box.
Back to BNFX - An Integral Power Trader Forex Broker
Power Trader is a product of Integral Development Corp., licensed and customised for BNFX Capital Ltd. All rights reserved.
RISK WARNING: Forex trading involves risk of loss and may not be suitable for all investors.