3 Trading
3.1 Placing Market Orders
A market order is an order to buy or sell a selected instrument at the current market price. A market order guarantees execution, but not a price or time of execution.
Power Trader provides several quick ways to place market orders.
3.1.1 Placing a Market Order in a Chart (Visual Trading)
Please see Visual Trading for details.
3.1.2 Placing a Market Order Using the Order Entry Panel
If you do not have the Order Entry panel (Order Entry Panel) open, right-click inside any panel and select New > Order Entry. Or use the ribbon at the top: Trading > Trading > Order Entry.
To enter a market order:
- At the top of the Order Entry panel is the account in which you want to trade.
- Select the instrument (symbol or currency pair). Click the
 button to choose an instrument from an Instruments Lookup panel (Instruments Lookup Panel).
TIP: When you open the Order Entry panel using the shortcut menu, the symbol selected in it is the one you right-clicked. To quickly change the symbol, drag the desired symbol from any panel to the Order Entry panel. If you keep the Order Entry panel open at all times, consider linking the Order Entry panel to the Watchlist panel (Watchlist Panel) to have the symbol you select in the Watchlist panel automatically selected in the Order Entry. For more details, see Linking Panels.
- In the Order section, enter the order settings as appropriate. The Order Entry panel changes according to the choices you make.

Figure 2: Order Entry Panel
- Select "Market" from the Type drop-down list.
- If you want to set a take-profit price to close the position when the order is executed, check the TP Price checkbox and enter a price in the field to set a take-profit price on the order. The price you enter is either an absolute price or a relative offset from the executed price. For more details, see General Settings.
- If you want to set a stop-loss price to close the position when the order is executed, check the SL Price checkbox and enter a price in the field to set a stop-loss price on the order. If you set a stop-loss price, choose the type of price by clicking the SL radio button for a stop-loss order or the Tr. Stop radio button for a trailing stop order. The price you enter is either an absolute price or a relative offset from the executed price. For more details, see General Settings.
- Select a period for which the order is effective from the Time In Force drop-down list. A GTC (good till cancel) order remains effective until you cancel it. If not filled the same day, a GTC order is carried over to the next day and so on. A Day order is effective during the current day only and, if not filled, is canceled by the system at the end of the day. An IOC (immediate or cancel) order is filled completely with the first execution it or it is cancelled.
- Enter the order amount in the field between the Buy and Sell buttons.
The four read-only fields at the bottom of the panel update dynamically to show the initial and maintenance margins for a short and a long position. The initial margin is the minimum account balance required to open the position you are requesting; the maintenance margin is the minimum account balance required to keep this position open.
- Click Sell to open a short position or Buy to open a long position.
- A message displays, showing the market price and asking you to confirm the trade. Click Yes.
TIP: To suppress these messages, select BNFX Button > Settings. In the Trading Defaults section, select Order entry defaults and clear the check against Confirm order placement.
Power Trader sends the request the server. After the trade executes, a server report displays, and the new position appears in the Positions panel (Positions Panel). If the position cannot be opened, you receive a rejection message indicating why the trade was not completed.
Market orders may fail for two reasons:
- If the order is too large, it cannot be filled. You should enter smaller amounts.
- If a market range is specified, the price may move beyond the range before the order is filled.
TIP: To turn off server reports, select BNFX Button > Settings. In the General section, clear the check against Show report popup boxes. You can choose to display small confirmation popups instead by placing a check against Show confirmation popup boxes.
You can also use the Orders section of the Order Entry panel (Order Entry Panel) to place a market order. In the Order field, select Market and click the Place order button.
3.1.3 Placing a Market Order with the Watchlist Panel (One-Click Trading)
You can place a market order from the Watchlist panel (Watchlist Panel) when it is in the board view:
- If the Watchlist panel is not already in the board view, click the List or Detail button in the title bar and select Board.
- In the cell for the symbol you want to trade, specify the amount you want to trade by clicking the up and down arrows, or type it in the field.
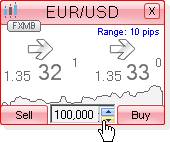
Figure 3: Specifying the Order Amount in an FX Cell (Default: In Units. 100,000 Units = 1.0 Lot)
- Click Sell to open a short position, or Buy to open a long position.
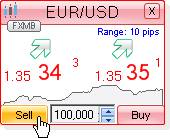

Figure 4: Entering a Sell or Buy Order in an FX Cell
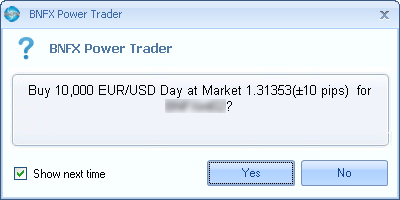
Figure 4B: Uncheck the "Show next time" checkbox for one-click trading
How to enable true one-click trading:
To enable true one-click trading (with no confirmation screens), place your first trade by clicking BUY or SELL on the cell for any currency pair. When the confirmation screen pops up,
uncheck the "Show Next Time" checkbox. In the future, when you place trades using an FX Cell by clicking on BUY or SELL, it will no longer pop up with a confirmation screen.
Alternatively, you may use the BNFX Button > Settings > Trading Defaults menu where you may disable all of the confirmation dialogs.
3.2 Placing Pending Orders
A pending order is an order to buy or sell a selected instrument when the market prices reaches the order price. You place pending orders with the Order Entry panel (Order Entry Panel).
You can submit the following types of pending orders:
- Limit: Limit orders are filled at the limit price or better, but are not guaranteed to fill. The limit price for buy orders is placed below the current market price. The limit price for sell orders is placed above the current market price.
- Stop: Used to open or close a position by buying if the market rises or selling if the market falls. The stop price for buy orders is placed above the current market price. The stop price for sell orders is placed below the current market price. A stop order turns into a market order when the stop is triggered, so the final execution price or time of a stop order is not guaranteed.
- Trailing stop: A stop order that continually adjusts the stop price based on changes in the market price. A trailing stop to sell raises the stop price as the market price increases, but does not lower the stop price when the market price decreases. A trailing stop to buy lowers the stop price as the market price decreases, but does not increase the stop price as the market price increases. In both cases, the stop "trails" the market price, moving along behind a position as that position begins to move in your favor. When the stop price is reached, the order becomes a market order.
- One cancels the other (OCO): An OCO order typically consists of a limit and a stop order. If the stop or limit price is hit, the order is executed and the opposing stop loss or limit order that was not hit is canceled. Power Trader allows you to link pending orders of various types together, including OCO orders, allowing you to effect sophisticated trading strategies with a few clicks. see Modifying a Pending Order for more information about linking orders.
If you do not have the Order Entry panel open, right-click inside any panel and select New > Order Entry. Or on the ribbon at the top of the window: Trading > Trading > Order Entry.
3.2.1 Limit Orders
To place a limit order:
- Select the instrument or instrument group. Click the
 button to bring up the Instruments Lookup panel (Instruments Lookup Panel).
TIP: When you open the Order Entry panel using the shortcut menu, the symbol selected in it is the one you right-clicked. To quickly change the symbol, drag the desired symbol from any panel to the Order Entry. If keeping the Order Entry panel open at all times, consider linking the Order Entry panel to the Watchlist panel (Watchlist Panel) to have the symbol you select in the Watchlist automatically selected in the Order Entry. For more details, see Linking Panels.
- In the Order section, enter the order settings as appropriate. The Order Entry panel changes according to the choices you make.
- Select "Limit" from the Type drop-down list.
- Enter a limit price in the Limit Price field.
- If you want to set a take-profit price to close the position when the limit order is executed, check the TP Price checkbox and enter a price in the field to set a take-profit price on the order. The price you enter is either an absolute price or a relative offset from the limit price. For more details, see General Settings.
- If you want to set a stop-loss price to close the position when the limit order is executed, check the SL Price checkbox and enter a price in the field to set a stop-loss price on the order. If you set a stop-loss price, choose the type of price by clicking the SL radio button for a stop-loss order or the Tr. Stop radio button for a trailing stop order. The price you enter is either an absolute price or a relative offset from the limit price. see General Settings for details.
- Select a period for which the order is effective from the Time In Force drop-down list. A GTC (good till cancel) order remains effective until you cancel it. If not filled the same day, a GTC order is carried over to the next day and so on. A Day order is effective during the current day only and, if not filled, is canceled by the system at the end of the day. An IOC (immediate or cancel) order is filled completely with the first execution it or it is cancelled.
- Enter the order amount in the field between the Buy and Sell buttons.
- Click the Buy or Sell buttons to send your order request to the server.
3.2.2 Stop Orders
To place a stop order:
- Select the instrument or instrument group. Click the
 button to bring up the Instruments Lookup panel (Instruments Lookup Panel).
TIP: When you open the Order Entry panel using the shortcut menu, the symbol selected in it is the one you right-clicked. To quickly change the symbol, drag the desired symbol from any panel to the Order Entry. If keeping the Order Entry panel open at all times, consider linking the Order Entry panel to the Watchlist panel (Watchlist Panel) to have the symbol you select in the Watchlist automatically selected in the Order Entry. For more details, see Linking Panels.
- In the Order section, enter the order settings as appropriate. The Order Entry panel changes according to the choices you make.
- Select "Stop" from the Type drop-down list.
- Enter a stop price in the Stop Price field.
- If you want to set a take-profit price to close the position when the stop order is executed, check the TP Price checkbox and enter a price in the field to set a take-profit price on the order. The price you enter is either an absolute price or a relative offset from the executed price. For more details, see General Settings.
- If you want to set a stop-loss price to close the position when the stop order is executed, check the SL Price checkbox and enter a price in the field to set a stop-loss price on the order. If you set a stop-loss price, choose the type of price by clicking the SL radio button for a stop-loss order or the Tr. Stop radio button for a trailing stop order. The price you enter is either an absolute price or a relative offset from the executed price. For more details, see General Settings.
- Select a period for which the order is effective from the Time In Force drop-down list. A GTC (good till cancel) order remains effective until you cancel it. If not filled the same day, a GTC order is carried over to the next day and so on. A Day order is effective during the current day only and, if not filled, is canceled by the system at the end of the day. An IOC (immediate or cancel) order is filled completely with the first execution it or it is cancelled.
- Enter the order amount in the field between the Buy and Sell buttons.
- Click the Buy or Sell buttons to send your order request to the server.
3.2.3 One-Cancels-the-Other (OCO) Orders
To place an OCO order:
- Select the instrument or instrument group. Click the
 button to bring up the Instruments Lookup panel (Instruments Lookup Panel).
TIP: When you open the Order Entry panel using the shortcut menu, the symbol selected in it is the one you right-clicked. To quickly change the symbol, drag the desired symbol from any panel to the Order Entry. If keeping the Order Entry panel open at all times, consider linking the Order Entry panel to the Watchlist panel (Watchlist Panel) to have the symbol you select in the Watchlist automatically selected in the Order Entry. For more details, see Linking Panels.
- In the Order section, enter the order settings as appropriate. The Order Entry panel changes according to the choices you make.
- Select "OCO" from the Type drop-down list.
- Enter a limit price in the Limit Price field.
- Enter a stop price in the Stop Price field.
- If you want to set a take-profit price to close the position when the limit or stop order is executed, check the TP Price checkbox and enter a price in the field to set a take-profit price on the order. The price you enter is either an absolute price or a relative offset from the executed price. For more details, see General Settings.
- If you want to set a stop-loss price to close the position when the limit or stop order is executed, check the SL Price checkbox and enter a price in the field to set a stop-loss price on the order. If you set a stop-loss price, choose the type of price by clicking the SL radio button for a stop-loss order or the Tr. Stop radio button for a trailing stop order. The price you enter is either an absolute price or a relative offset from the executed price. For more details, see General Settings.
- Select a period for which the order is effective from the Time In Force drop-down list. A GTC (good till cancel) order remains effective until you cancel it. If not filled the same day, a GTC order is carried over to the next day and so on. A Day order is effective during the current day only and, if not filled, is canceled by the system at the end of the day. An IOC (immediate or cancel) order is filled completely with the first execution it or it is cancelled.
- Enter the order amount in the field between the Buy and Sell buttons.
- Click the Buy or Sell buttons to send your order request to the server.
After the order is accepted, a server report is displayed, and the new order appears in the Orders panel (Orders Panel). If the order cannot be accepted, you will receive a rejection message indicating the reason.
When the order is filled, another report will be displayed; the order will disappear from the Orders panel, and a new position will be added to the Positions panel (Positions Panel).
TIP: To turn off server reports, select BNFX Button > Settings. In the General section, clear the check against Show report popup boxes. You can choose to display small confirmation popups instead by placing a check against Show confirmation popup boxes.
3.3 Using Stop Loss and Take Profit Prices
You can place a stop loss or take profit order on an open position or on another pending order. When the pending order fills, the stop loss or take profit price applies to the resulting position.
To set a stop loss or take profit price:
- Right-click on the position or order and select Set Stop Loss Price or Set Take Profit Price. Depending on what you click, the Set SL Price or Set TP Price dialog box appears. Either dialog box can be used to set both the stop loss or take profit price.
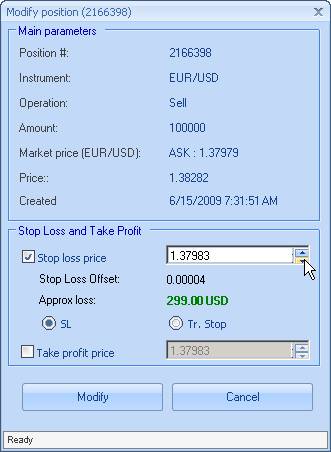
Figure 5: Modify Position Dialog
- Specify the stop loss or take profit price using the up and down arrows, or type the price directly. The Approximate profit shows your loss or profit if the position closes at the stop loss or take profit price you set.
For example, the figure above illustrates setting a stop loss price of 1.4912 for a position in EUR/USD that, when closed at the stop loss price, results in a loss of USD 1,200.00.
- Click the Send button.
After your request finishes processing, a server report appears. The specified price appears in the SL or TP column of your the Positions panel (Positions Panel) or Orders panel (Orders Panel).
3.3.1 Modifying a Stop Loss or Take Profit Price
To modify a stop loss or take profit price, right-click the position or the order in the corresponding panel and select Set Stop Loss Price or Set Take Profit Price to open the corresponding dialog box. Change the setting in the Stop loss price or Take profit price field and click Send.
3.3.2 Viewing Your Stop Loss and Take Profit Orders
Setting a stop loss or take profit price essentially places a close order that you can view in the Orders panel (Orders Panel) along with your open orders.
To display the stop loss and take profit orders, right-click the Orders panel and select Show Close Orders (SL/TP). Once your close orders are shown in the panel, you can modify (Modifying a Pending Order) or cancel (Canceling Pending Orders) them just as you would open pending orders.
3.4 Closing a Position
To close a position:
- Select the position to close in the Positions panel (Positions Panel).
- Right-click and select Close [position #] in account [account ID].
- A message appears asking you to confirm the close. Click OK.
Power Trader sends the request to the server. After the trade executes, a server report displays, and the position disappears from the Positions panel.
TIP: To turn off server reports, select BNFX Button > Settings. In the General section, clear the check against Show report popup boxes. You can choose to display small confirmation popups instead by placing a check against Show confirmation popup boxes.
3.4.1 Using the Board View
When using the board view, click Close.

Figure 6: Closing a Position in the Positions Panel Board View
A message appears asking you to confirm the close. Click OK to confirm.
3.5 Closing a Position Partially
You can close a part of a position, provided the amount of the position is larger than the minimum trade amount allowed for your account type. (For example, if you have an open position of 100,000 but your minimum allowed trade size is 10,000 then you may close one tenth of your position at a time.)
To close a position partially:
- Select the position to close in the Positions panel (Positions Panel).
- Right-click and select Close [number] in account [account name]. The Close position dialog box appears (here we assume that you are closing a SELL position):
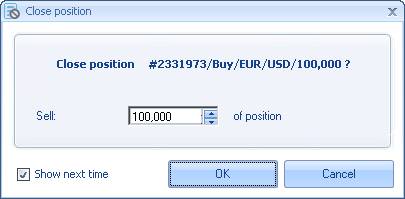
Figure 7: Close Position Dialog
- The Sell (or Buy, if you are closing a SELL position) field displays the total amount (or lots) of the position. Use the down button to specify the amount you want to close, or type the amount in.
- Click OK. A message displays asking you to confirm the trade. Click OK again; the request will be sent to the sever.
TIP: To avoid these messages showing up, select BNFX Button > Settings. In the Trading Defaults section, select Order entry defaults and clear the check against Confirm order placement.
After the trade executes, a server report displays, and the position will be replaced by the new, smaller-amount position. If the position cannot be closed, you will receive a rejection message indicating why the trade was not completed.
3.5.1 Using the Board View
You can close part of a position in the board view also.
To close a part of a position from the board view:
- Click the Close field at the bottom of the FX Board. The Close position dialog opens as described above.
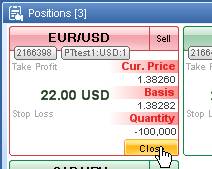
Figure 8: Closing a Position in the Positions Panel Board View
- Chose the amount to close and click OK.
- A message displays asking you to confirm the trade. Click OK. Power Trader sends the request to your Broker.
3.6 Closing Opposite Positions (Mutual Close)
You can execute a mutual close of opposite positions, BUY and SELL positions in the same instrument. This helps you save on spread costs as compared to closing each position separately. You can close any number of opposite positions in the same instrument at the same time.
To mutually close opposite positions:
- Select the positions to close in the Positions panel (Positions Panel). To select multiple entries, hold down the Ctrl key and click each entry. To select a range of entries, hold down the Shift key and click the first and last entries of the range.
- With all positions selected, right-click and select Mutual Close. The Mutual Close dialog box appears:
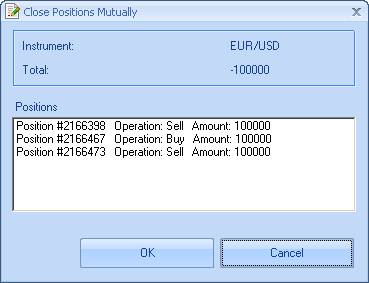
Figure 9: Closing Opposite Positions
- Click OK to confirm close. The request is sent to the server.
If the positions involved in the mutual close are of the same amount, the Close Positions Mutually box displays zero amount in the Total field. In this case, no position will be open after the mutual close.
If the positions for the mutual closed are of different amounts, the Close Positions Mutually box displays the resulting position amount in the Total field. If the amount is negative, a SELL position will be open. Otherwise, the resulting position will be a BUY position.
For example, the figure above illustrates mutual closing of four positions in EUR/USD that result in a BUY position of 175,000.
After the trade is executed, a server report (or reports, if a new position is open) displays, and the positions disappear from the Positions panel or are replaced by the resulting position. If the positions cannot be closed, you receive a rejection message indicating why the trade was not completed.
3.7 Modifying a Pending Order
You can only modify pending orders that have not yet been executed to open a position.
To modify a pending order, you can do one of the following:
- In the Orders panel (Orders Panel) in list or detail view, right-click the order and select Modify Order.
- In the Orders panel in board view, click Modify in the order's cell.
- In a chart, right-click the order's line and select Modify Order.
This opens the Modify Order dialog box.
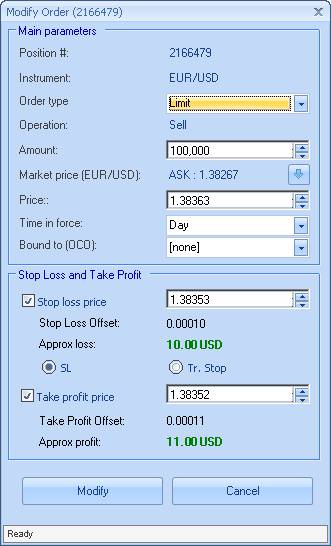
Figure 10: Modify Order Dialog
Use the editable boxes to change order type, amount, price, time in force, the order to which this order is bound (OCO), stop-loss or take-profit price.
To specify the new order price, do one of the following:
- Enter the price directly in the Price field.
- Use the arrow button
 next to the Market price field that shows the current market price updated dynamically. Click the button to enter a new price with the same offset as the previous price.
Click Modify when done. A message is displayed asking you to confirm the changes. Click Yes.
After the request is processed, a server report is displayed, and the order details update.
TIP: To suppress the confirmation message, select View > Settings. In the Trading Defaults section, select Order entry defaults and clear the check against Confirm order modification.
3.8 Canceling Pending Orders
You can cancel a single pending order, all orders in the same instrument, or all orders placed in the same account.
3.8.1 Canceling a Single Order
To cancel a single pending order, right-click on it in the Orders panel (Orders Panel) and select Cancel Order > Cancel order [order #], or double-click the order. If using board view, click Cancel in the order's cell. A message is displayed asking you to confirm the cancel. Click Yes.
3.8.2 Canceling All Orders in an Instrument
To cancel all orders in an instrument, right-click on one of the orders and select Cancel Order > Cancel all by symbol [symbol name]. Click Yes in the message is displayed asking you to confirm the cancel.
3.8.3 Cancelling All Orders in an Account
To cancel all orders in an account, right-click on one of the orders and select Cancel Order > Cancel all for account [account ID]. Click Yes in the message is displayed asking you to confirm the cancel.
TIP: To suppress the confirmation messages, select View > Settings. In the Trading Defaults section, select Order entry defaults and clear the check against Confirm order cancellation.
3.9 Modifying a Position
To modify a position, right-click on it in the Positions panel (Positions Panel) and select Modify Position. This works from both the List view and the Board view. This opens the Modify position dialog box.
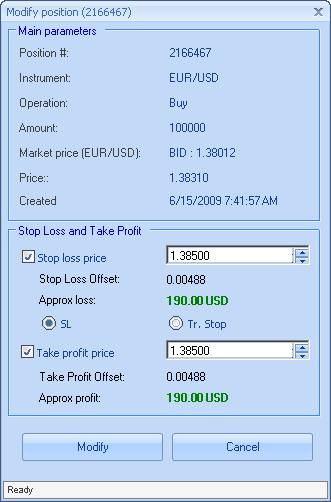
Figure 11: Modify Position Dialog
Use the check boxes to set Stop Loss or Take Profit prices. Click Modify when done. A message displays asking you to confirm the changes. Click Yes.
After the request is processed, a server report displays, and the order's details update.
TIP: To avoid the confirmation message showing up, select View > Settings. In the Trading Defaults section, clear the check against Confirm order modification.
3.10 Trader's Linked Accounts
If enabled, a trader can trade for more than one account. To use this functionality, please request it from Customer Support.
A trader can create his or her own account group comprising one or more of the linked accounts and trade on behalf of the group. The account groups appear in the Order Entry panel.
Figure 12: Account Groups for Linked Account Users
Back to BNFX - An Integral Power Trader Forex Broker
Power Trader is a product of Integral Development Corp., licensed and customised for BNFX Capital Ltd. All rights reserved.
RISK WARNING: Forex trading involves risk of loss and may not be suitable for all investors.